Why should i use CVS ?
CVS ( Concurent Version System ) is used in distributed development. Problems in distributed development
arise if more than one person works on a source file ( e.g. a texture, a modell, a c++ file ). Imagine 2
people adding stuff to file blah.cpp. Both loading down the file and doing the changes. The 2nd finishes
first and uploads the file. The other is done shortly after and uploads too. He will overwrite everything
the other did !
The solution is CVS.
There are different ways CVS solves the problem:
1) Both loading down the source with CVS. After the first person loaded the file blah.cpp for editing,
it is locked until he uploads the file and unlocks it this way. This means, while somebody is working on a
file, no one else can work on that file.
Since this is usually not wanted, there is another way:
2) Both can download the source whenever they want. They do their changes. Before they upload the source they
update the source from the server. That means, the cvs program downloads only files that differ from the ones
on your harddisk. Furthermore it merges changes made to the file on the server into the file on your
harddisk. Now are all changes made by you and others in your file.
THAT DOES NOT MEAN YOUR FILE IS VALID NOW
You should check it now ( in case of program files a recompilation should do it normally ). In case of binary
files like textures there is probably no way the cvs system can help you. You should communicate with the
people who are working on such files ( well you should anyway ! ).
After you check your files they can be commited to the server.
Another advantage the cvs system provides is that it records all changes made to files. You can restore any
prior version of the file.
How do i install CSV ?
I will only explain what to do to install CVS on a Windows system. The cvs used on Win platforms is usually
WinCVS ( there are others but i will only explain WinCVS ). Since you will need developer access ( that is you can read from and write to the code repository on the central server ) you will also need a program that encrypts communication with the central CVS server ( Sourceforge.net where our codebase is requires that ).
You can get that encryption program here and WinCVS here.
Installing the encryption program
- Create a directory c:\home
- Create a directory c:\ssh
- Create a directory c:\etc
- Create a file called passwd in c:\etc with just one line in it. The line reads like this:
maddmax:x:1:10:blah:c:/home:c:/windows/command.com
Replace maddmax with your username on sourceforge.
- Unpack the encryption program to c:\ssh
- if you use Win9x
- open your favorite editor and load c:\autoexec.bat
- expand your PATH variable with c:\ssh, e.g.: first it says
PATH c:\windows;c:\windows\command and after your changes it looks like PATH c:\ssh;c:\windows;c:\windows\command
- insert a new line next to the PATH line
- in that line you write
set HOME=c:\home
- if you use WinNT
- open the Control Panel, System, Environment and add c:\ssh to your System path
- add a new variable called HOME and set it to c:\home
- reboot your computer
- Unpack the WinCVS file and start the setup program that is included
- start the WinCVS program
- in menu "Cvs Admin" select "Preferences" and adjust the dialog you see to match the following shown:
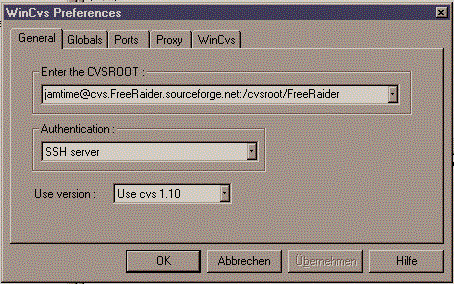
- in CVSROOT replace "jamtime" with your sourceforge member name
- select "Globals" and make it look like this:

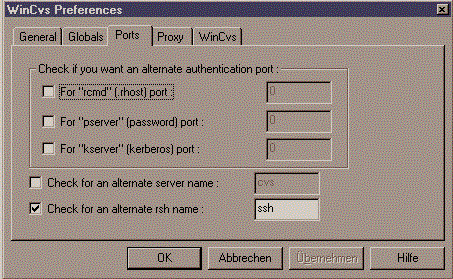
- select "Ports" and make it look like this:
- select "Proxy" and change it according to your needs
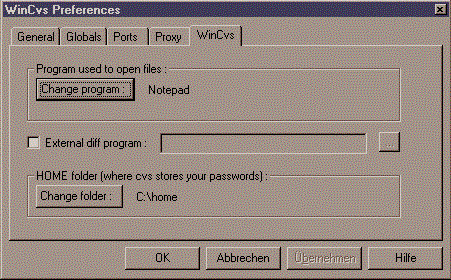
- select "WinCvs" and make it look like this:
- press the OK button
Congratulation, you are now done with configuring WinCVS.
Using WinCVS
Checkout the FreeRaider sources
- in menu "Cvs Admin" select "Checkout module..."
- in a window like the follwing you will be asked for a directory. That is the places, where the sources will be stored.
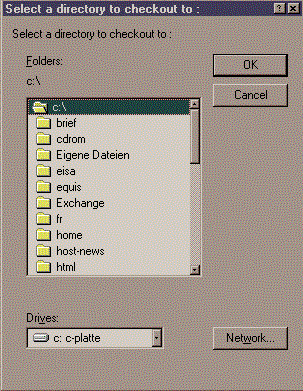
In the directory you choose will be a subdir created called FR ( this is done by WinCVS )
- Press the OK button
- Now change the new window showing up to match the following picture ( except the "Change Folder" ):
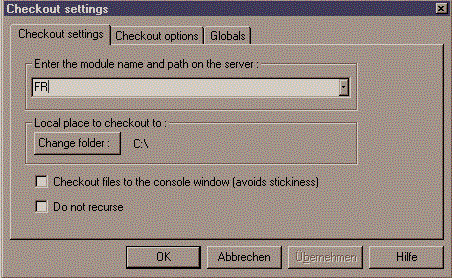
The "FR" in the "module name and path" field simply names the main module of FreeRaider.
- hit the OK button
- now a DOS box should appear ( probably minimized on your task bar ) asking for your password ( that is the one you have choosen when you became a member on sourcefore.net )
- Enter the password and press RETURN ( note: while entering the password nothing changes in the dosbox )
- Now WinCVS should start downloading the sources into the directory you have choosen.
Changing files and commiting the changes to the server
- use whatever tool to work on the files but do not chnage the location of the file
- start WinCVS
- in the upper window of WinCVS click through the directories to the files you have changed.
- mark the files you changed ( use the usual leftmouse/ctrl/shift combinations )
- now rightclick with the mouse and choose "Commit selection"
- a window will appear asking you to add a comment. Here you make s short description of the changes you did to the files
- press OK button
- the DOS box will ask you for your password and after you entered it the files are send to the server
Now the files can be downloaded by others including your changes.
Adding files and commiting the new files to the server
- Create the files you want to add in the somewhere in the FR subdirectory ( well, not somewhere but where you want them to be )
- start WinCVS
- in the upper window of WinCVS click through the directories to the files you have added.
- mark the files you added ( use the usual leftmouse/ctrl/shift combinations )
- now rightclick with the mouse and choose "Add selection" or "Add selection binary" if you want to add binary files like textures.
- the DOS box will ask you for your password and after you entered it the files are marked for being added, they are not added yet.
- now rightclick with the mouse and choose "Commit selection"
- the DOS box show up again and after you entered it the files are send to the server
Now the files can be downloaded by others.
Deleting files
See adding files, except you select "Remove selection".
Updating files
You do not need to download all the files over and over again but only those that changed since your last checkout/update.
- In the upper window of WinCVS click through until you are in the FR directory.
- In menue "Cvs Folders" select "Update Folder...".
- the DOS box will ask you for your password and after you entered it all changed files will be updated. After that your FR directory will equals the one on the server.
There are many more options, i can't explain them all here ( well, i could but i'm way too lazy ). But the above should cover the main tasks you can do with WinCVS.
norman
Last modified: Sat Oct 7 00:25:57 CEST 2000